Coffee Brewing Method Comparison Chart for Every Taste Preference
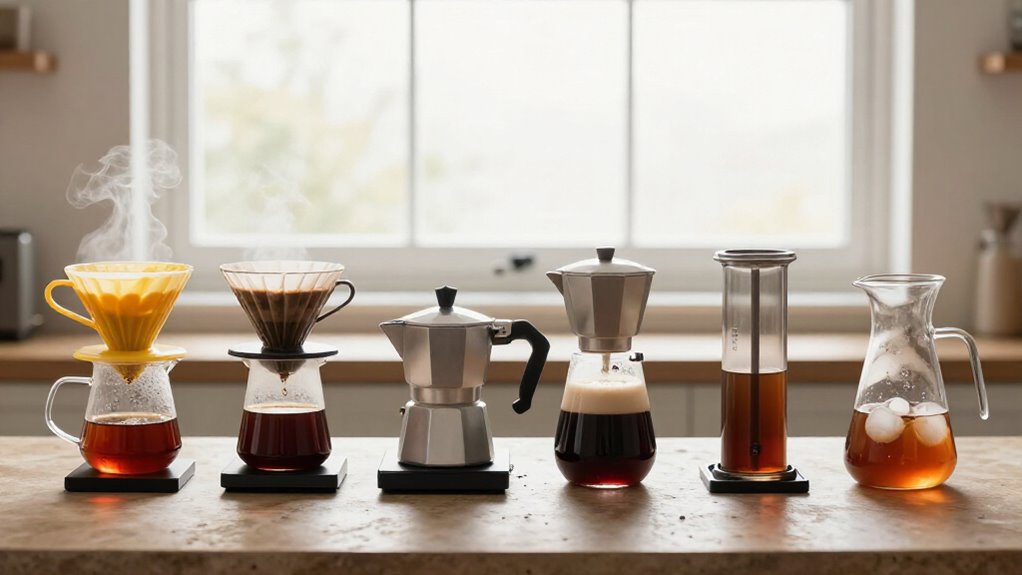
Choose your brewing method by matching taste, body, clarity, acidity, and intensity. For clean, nuanced cups, use a paper-filtered V60 or Chemex.
Choose French press for oily, full-bodied richness.
AeroPress delivers smooth, low-bitterness intensity, while Moka pot and espresso provide concentrated strength.
Use medium-fine grounds and 92–96°C water for pour-over, coarse grounds for immersion, and adjust one variable at a time: finer or hotter for sourness, coarser or cooler for bitterness.
More detail sharpens technique.
Flavor Preference Quick Matches
What kind of cup do you want? For clean, bright, nuanced flavor, choose a paper-filter pour-over, such as a V60 or Chemex: the filter removes oils and fines, so you’ll perceive greater clarity. If you prefer full-bodied, rich, robust coffee, use a French press. Full immersion and its metal plunger retain more oils and fines, producing a denser, richer mouthfeel. For smooth, low-bitterness, low-acid intensity, select an AeroPress. It delivers a dark, smooth profile with only slight bitterness while keeping preparation quick. When you want strong, concentrated, espresso-like intensity, choose a Moka pot, but stop heating as flow begins to limit bitterness. For maximum intensity in small or milk-based drinks, use espresso: fine grounds and ~9 bars force water through coffee in 25–30 seconds.
Grind, Temperature, Time Matrix
Your grind size, water temperature, and contact time jointly determine extraction, so changing one variable can require adjustments to the others. Use this matrix to tune flow without chasing frustration:
| Method | Grind | Temperature/time |
|---|---|---|
| Pour-over | Medium-fine (200–400 µm) | 92–96°C; 2:30–3:00 |
| French press | Coarse (900–1,200+ µm) | 90–96°C; 3–4 min |
| Cold brew | Coarse | 4–25°C; 8–24 hr |
Choose a burr grinder: uniform particles keep your recipe predictable. If the cup tastes sour, move finer or hotter; if it tastes bitter or astringent, move coarser or cooler.
Keep contact time stable while changing one variable, then reassess. For delicate light roasts, favor the upper temperature range; darker roasts often respond better to gentler heat. Your setting isn’t a universal number—it’s the point where clarity, body, and sweetness feel balanced.
TDS, Extraction, and Yield
How strong your coffee tastes depends on more than extraction alone: TDS measures the concentration of dissolved coffee solids, while extraction describes how much soluble material the water removes from the grounds. You’ll taste higher TDS with tighter coffee-to-water ratios, such as French press at 1:12, 1:15, while drip at 1:15, 1:17 tastes lighter. Don’t confuse concentration with completeness: time, temperature, and contact style shift extraction, from roughly four-minute immersion to rapid AeroPress pressing or pressure-assisted espresso and Moka pot brewing.
Yield—the mass of finished coffee—also changes TDS, so measure dose and output rather than filling a mug. Paper filtration removes oils and fines, improving clarity and reducing harshness. Because small ratio changes alter flavor, adjust one variable at a time.
Water-to-Coffee Ratios by Method
You’ll typically use 1:15 to 1:17 for standard and drip coffee, balancing strength with consistent extraction. For French press, choose 1:12 to 1:15, while pour-over generally uses 1:16 to 1:17 for greater clarity and brightness.
Cold brew requires a stronger 1:4 to 1:8 ratio because you’ll often dilute the low-acid concentrate after its extended extraction.
Standard Coffee Ratios
Standard coffee ratios determine both brew strength and extraction balance, but the ideal range varies by method. When you read ratios as coffee to water, 1:15 means one gram of coffee to 15 grams of water. For French press, choose 1:12–1:15; the stronger range offsets extended immersion and supports a fuller extraction.
Pour-over methods, including V60 and Chemex, you’ll generally find at 1:16–1:17, preserving clarity while maintaining strength. Cold brew requires 1:4–1:8, then 12–24 hours of steeping; this concentrated base delivers smooth, low-acid flavor and may need dilution. Espresso uses 1:2–1:3 with fine grounds and pressure, producing high intensity in a small yield. Adjust within each range according to roast, grind, contact time, and taste, rather than changing ratio alone without overcorrecting balance.
Drip Coffee Ratios
Automatic drip coffee typically performs best at a 1:15–1:17 coffee-to-water ratio, or about 15–17 g of water per gram of coffee. For a practical benchmark, use roughly 0.5-ounce (15-g) coffee per 8-ounce (250-ml) water. This proportion suits hot, gravity brewing, rather than prolonged immersion or pressure extraction.
Small ratio changes shift perceived strength and balance noticeably. If your cup tastes bitter, reduce the coffee slightly and move toward 1:17; if it tastes weak or underwhelming, add coffee and move toward 1:15. Keep your grind and water temperature consistent while dialing in, so the ratio remains the principal variable. For an 8-ounce serving, 15–17 g coffee corresponds to approximately 225–289 g water, though your brewer’s measured volume may differ slightly because of retention and scale.
French Press Ratios
Keep the steep stable, adjust only the ratio, and taste systematically to isolate strength from extraction imbalance within your French press.
Pour-Over Ratios
After comparing French press ratios, apply the same controlled approach to pour-over, where Chemex and V60 recipes commonly use a 1:16 to 1:17 coffee-to-water ratio. Use 15–17 grams of coffee with 250 milliliters of water as your starting point. At 1:16, you gain more overall strength and body; at 1:17, you emphasize clarity and brightness. Keep the grounds and grind consistent, so ratio remains the variable.
If your cup tastes thin or sharply sour, you can move toward 1:16; if it tastes heavy or bitter, check extraction before adding water. A finer grind can increase extraction, so don’t confuse bitterness with excessive coffee. Conversely, lowering the coffee dose relative to water may weaken flavor and expose under-extraction. These small adjustments preserve pour-over clarity while letting you calibrate strength.
Cold Brew Ratios
For cold brew, start with a coffee-to-water ratio between 1:4 and 1:8 by weight: use the tighter 1:4 range for a stronger concentrate and the looser 1:8 range for a milder cup. Measure by weight, since ratio changes noticeably shift strength and balance. Use coarsely ground coffee and steep it in cold or room-temperature water for 12–24 hours.
At 1:4, you’ll produce a concentrate suited to dilution or iced drinks; at 1:8, you’ll get a drinkable brew with lower intensity. Intermediate ratios let you tune body and extraction without changing time or grind. Expect smooth, sweet chocolate notes and low acidity, but don’t expect the brightness of hot-brew methods. If the result tastes thin, tighten the ratio; if it tastes overly heavy, add water.
Adjusting for Brew Volume
When you adjust brew volume, don’t change only the water or coffee; preserve the method’s coffee-to-water ratio, because even small shifts can alter strength, extraction, and bitterness. Calculate coffee and water together as volume × ratio, then keep contact conditions stable. For a V60, use roughly 1:16 to 1:17; about 21 g coffee suits a pour and preserves clean, bright balance.
With a French press, maintain 1:12 to 1:15 and a four-minute steep. Changing steep time as volume increases can shift extraction and bitterness.
An AeroPress remains a one-cup brewer, so repeat presses instead of doubling its recipe. For larger automatic-drip batches, target 1:15 to 1:17 and let the machine maintain temperature and timing.
If you change only water or coffee, you’ll make a different beverage, not a larger version.
Altitude, Hard Water, Decaf
Scaling the recipe preserves strength, but altitude, water chemistry, and bean processing can still change extraction. At higher elevations, lower boiling points can leave coffee thin or sour, so try a finer grind or stronger ratio. Change one variable at a time; shifting from 1:17 to 1:15 can increase strength and alter balance.
Hard water’s minerals may mute clarity and amplify bitterness. Filtered or softer water helps method extract cleanly and consistently. For decaf, favor methods such as pour-over or AeroPress: its chemistry can turn flat when you over-extract.
On a drip machine, begin at 1:15–1:17, then use “bold” only if cup tastes weak. Keep temperature, contact time, and grind stable while testing adjustments, so you can identify the cause of a flavor change.
Moka Pot Dark Roast
A moka pot turns dark roast into a concentrated, full-bodied coffee through stovetop pressure, producing more intensity than drip but less crema and concentration than espresso. You’ll get a bold, heavy-bodied cup because pressure carries soluble compounds and oils into the upper chamber. Fill the base with just-below-boiling water, add a fine grind without compressing it, and heat moderately; tamping can obstruct flow and raise pressure excessively.
Watch the first coffee stream, then remove the pot from heat. Open and close the lid, then chill the base to interrupt extraction and limit bitterness. Compared with espresso, moka coffee offers lower concentration and less crema; compared with drip, it provides greater intensity and body. Dark roast suits its rich profile, but precise timing prevents harshness.
Rinse Paper Filters Thoroughly
Before brewing, rinse the paper filter thoroughly with right-off-the-boil water to remove papery flavors and preheat the dripper. This step matters most with V60 or Chemex, where paper filtration strongly shapes clarity and body. Don’t treat it as cosmetic; the rinse removes the filter’s flavor impact, allowing the coffee’s aromatics and acidity to register more cleanly.
- Insert the filter and wet every seam and fold.
- Let hot water pass through, then discard it completely.
- Confirm the paper seals against the dripper before adding grounds.
Thorough wetting also stabilizes the filter, reducing movement and helping prevent channeling during your pour. If you skip the rinse, you may taste a noticeable paper or woody note, with a harsher, less nuanced cup in comparison.
AeroPress Inverted Technique
With the paper filter rinsed and the AeroPress preheated, you’ll brew inverted by placing the chamber upside down, adding a table-salt, consistent grind, and pouring in about 220 g of water for 17 g of coffee. After a short immersion, stir, flip onto your mug, and plunge steadily. The paper microfilter removes sediment while retaining soluble oils for a dark, smooth, rich cup with little bitterness.
Dial in your preference:
- Keep a table-salt grind; finer particles extract faster and risk bitterness.
- Adjust immersion time before ratio; contact time shifts balance.
- Compare French Press: AeroPress keeps immersion body but finishes cleaner.
It suits you when you want French-Press richness with cleaner paper-filter definition, quickly. Its compact puck makes cleanup fast, practical for precise single-cup travel brewing.
Conclusion
Use this chart to match your flavor with a brewing method; you’ll then refine grind, temperature, time, and ratio systematically. Track TDS and extraction when you need repeatable results, but interpret them alongside taste, not in isolation.
Scale water and coffee together as volume changes, and adjust for altitude, water hardness, or decaf density. Rinse paper filters thoroughly, and use inverted AeroPress technique or brew a dark roast in a moka pot when it suits your palate.