How to Clean a Coffee Maker Carafe and Remove Stubborn Stains
Start with a cool, undamaged carafe, and never expose hot glass to cold water.
Fill it with equal parts warm water and white vinegar; soak two to four hours, or overnight for stubborn brown stains.
For heavy buildup, use crushed ice, three tablespoons salt, and two tablespoons lemon juice, swirling for one minute.
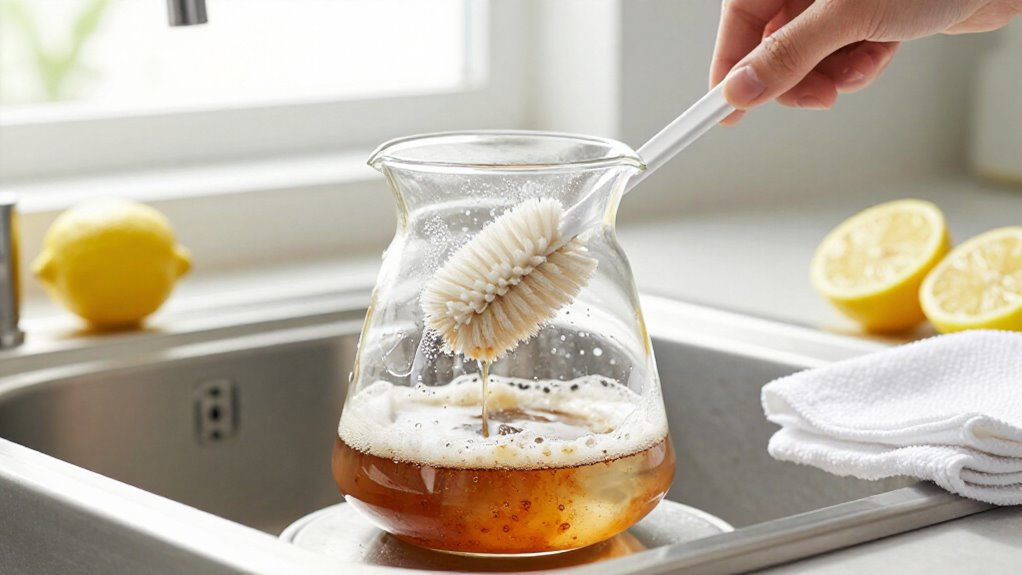
Scrub with a soft bottle brush, rinse thoroughly, and air-dry upside down.
If you keep going, you’ll find more safety tips ahead.
For Stubborn Coffee Stains
For stubborn coffee stains, start with the salt, ice, lemon method: add 3 tablespoons of salt, 2 tablespoons of fresh lemon juice, and 1 cup of crushed ice to the carafe. Swirl it vigorously for about one minute, letting the crushed ice scour residue without scratching the surface. Rinse with cold water; you’ll then use a soft bottle brush on remaining spots.
For a stronger treatment, fill the carafe with warm water, add two denture-cleanser tablets, and let the fizzing solution sit for 15 minutes. Scrub and rinse thoroughly; stubborn marks may need a second round.
Alternatively, make a baking-soda paste with just enough water, scrub for one minute with a bottle brush, and rinse. For severe buildup, soak overnight in diluted vinegar, then rinse thoroughly.
Start With a Cool Carafe
Always start with a cool carafe to prevent burns and thermal shock, which can crack or shatter glass. Set it on a heat-resistant surface, never a cold or wet sink. Let brewed coffee cool at room temperature before cleaning.
- Glass: Wait about 20–30 minutes before rinsing or exposing it to sudden temperature changes.
- Stainless steel: Allow 30–60 minutes; insulated walls retain heat, and trapped pressure can cause splattering when you open the lid.
- Plastic or double-wall glass: Cool completely to help prevent warping and damage to seals.
Use mitts if the carafe remains above a comfortable-touch temperature, about 45°C/113°F, and pour residual coffee slowly away from your face. Don’t immerse a hot carafe in cold water. Inspect cracks, chips, or warping; replace it if you notice damage or hear a pop.
Vinegar-Soak Timing Guide
How long should the vinegar soak? For routine stains, let an equal-parts solution of distilled white vinegar and warm water sit for a few hours. Fill your carafe to the brim for full coverage.
| Soak time | Best use |
|---|---|
| 2–4 hours | Light stains and mineral film |
| Overnight | Brown, stubborn residue |
Overnight soaking usually delivers the most sparkling result, with only minimal cloudiness left behind. If you’re short on time, a shorter soak still works, though overnight performs best.
For heavy brown spots, add a few drops of dish soap to the solution. Then empty the carafe and rinse it thoroughly with clean water to remove vinegar, soap, and loosened residue for a clean finish. Avoid thermal shock: don’t pour boiling water into a cold carafe.
Scrub With a Bottle Brush
Choose a soft-bristle bottle brush that reaches the carafe’s bottom and sides without scratching them. Add warm, soapy water, or a baking soda paste for stubborn brown stains, and scrub hard-to-reach areas for about one minute.
Rinse thoroughly until no cloudy residue remains, then dry the carafe completely.
Choose The Right Brush
Reach the carafe’s narrow neck and bottom corners with a firm-bristled bottle brush sized to fit inside without scraping the glass. Choose a brush with bristles firm enough to loosen brown coffee deposits and cloudiness. For glass, use nonabrasive nylon bristles; for stainless or thermal interiors, follow the manufacturer’s guidance and avoid metal wire.
A diameter that fits snugly lets you apply pressure without forcing the handle or striking the walls. Pair the brush with baking-soda paste, made with just enough water to bind it, and scrub for about one minute. Work the neck, bottom, and corners, turning the brush to keep bristles in contact. For salt-and-ice methods, scrub spots the ice misses. Rinse, inspect, and repeat spot-scrubbing if film or cloudiness remains.
Add Warm Soapy Water
With the carafe still damp, fill it with warm water and add a few drops of dish soap. Insert a soft-bristle bottle brush and scrub the interior in circular motions. Work across the walls, then concentrate on the bottom, where coffee sediment and oils collect.
Brush any cloudy brown rings until the loosened residue lifts, adding pressure rather than forcing the bristles. Let the soapy water sit briefly if the film remains, but don’t depend on soaking alone; mechanical scrubbing does the work. Empty the carafe and rinse it thoroughly with cold water until no bubbles or soap film remains.
If brown spots persist, repeat the scrub-and-rinse cycle before moving to a stain-removal method. Avoid abrasive pads that could scratch the surface.
Scrub Hard-To-Reach Areas
Once an effective soak has loosened the coffee oils, use a soft-bristle bottle brush to scrub the carafe’s bottom, sides, corners, and edges. Work the bristles around the base, along seams, and beneath the rim, where soaking water may not reach. Rotate the carafe as you brush, applying steady, gentle pressure rather than forcing the handle against the opening.
Use a small soft brush for the lid, spout, gasket, and other crevices. For glass, stainless steel, or plastic, don’t use abrasive pads and steel wool, which can scratch surfaces and trap residue. If a film remains, spread a paste of baking soda and enough water, then scrub for one minute. Rinse thoroughly with warm water until no cleaner or loosened residue remains. Dry fully.
Target Stubborn Coffee Stains
For stubborn coffee stains, mix baking soda with just enough water to form a thick paste, then apply it directly to the discolored areas.
Work the paste into the glass with a soft-bristle bottle brush, focusing on the bottom, sides, and coffee line. Scrub firmly for about one minute to lift dark residue and cloudy buildup without scratching the surface.
If the stain resists, don’t depend on a long soak. Instead, add crushed ice and salt, then swirl the carafe for about one minute; the abrasive ice helps dislodge deposits soaking may leave behind. Use only this method on a sturdy glass carafe, and avoid sudden temperature changes. Keep brushing until the interior looks clear, then rinse away loosened particles and residue.
Rinse And Dry Thoroughly
After scrubbing away the stains, rinse the carafe thoroughly with cold water to remove loosened coffee oils and cleaning residue. Rotate the carafe as you fill it, then pour the water out repeatedly so it reaches the bottom and sides where your bottle brush scrubbed. For stubborn patches, spend about one minute brushing them before rinsing again. Don’t use hot water on a cold glass carafe, because sudden temperature changes can cause thermal shock.
Dry the carafe immediately with a clean, lint-free towel, or let it air-dry upside down. Check the bottom for cloudiness, streaks, or remaining film before storing it. If you still see residue, repeat the rinse and brush step. Complete this routine after stain removal to protect flavor and prevent buildup.
For French Press Carafes
Disassemble the plunger and filter before cleaning, and brush away trapped grounds. For stubborn stains, swirl 3 tablespoons of salt, 2 tablespoons of lemon juice, and 1 cup of crushed ice for about a minute, then scrub remaining spots with a bottle brush.
Rinse every part thoroughly with cold water and let it dry completely before reassembling.
Disassemble Before Cleaning
Before cleaning a French press, remove the lid, plunger, and mesh filter from the glass carafe so you can reach every stain-prone surface. Disassembly keeps trapped coffee oils and residue from redistributing onto the carafe walls when you swirl a cleaning solution. Set the parts aside, noting how the filter layers and gasket fit together.
Clean the carafe separately, then clean the metal or plastic pieces immediately so grime doesn’t dry. Check for loose screens, worn seals, or hidden grounds, and keep small components together.
Rinse every piece until the water runs clear and no cleaner residue remains. Let everything air-dry fully, or use a clean towel. Reassemble only when parts are dry; moisture can cause odors, and residue may affect your brew’s taste.
Scrub Stubborn Coffee Stains
Once the French press parts are removed, tackle stubborn stains with a salt, ice, lemon scrub: add 3 tablespoons of salt, 2 tablespoons of fresh lemon juice, and 1 cup of crushed ice to the glass carafe. Stir and swirl mixture around sides for one minute; crushed ice lifts coffee film without scratching glass. Rinse with cold water, then inspect brown spots. For leftovers, use a soft bottle brush or nonabrasive sponge on each mark.
For heavy stains, make a baking soda paste with enough water, scrub it with a brush for one minute. For very stubborn marks, fill the carafe with warm water, add two denture tablets, wait 15 minutes, then scrub and rinse. Avoid abrasive pads or steel wool; scratches trap oils and stains.
Rinse And Dry Thoroughly
Give the French press carafe a final rinse with cold water to flush loosened coffee film from the bottom, seams, and spout. Swirl the water through the filter assembly, then pour it out rather than trapping grounds or residue inside.
Check for cloudy patches or remaining stains. If you spot any, scrub briefly with a soft brush or nonabrasive sponge, then rinse repeatedly until the water runs clear and no cleaner or coffee scent remains.
Dry the carafe with a clean, lint-free cloth, including the rim, seams, spout, and plunger opening. Don’t reassemble the press until every part is completely dry, especially around the filter assembly, where trapped moisture can create a musty odor. Rinsing and drying prevent streaks, cloudiness, lingering smells, and residue.
Coffee Oils Rinse Away
Coffee oils won’t simply rinse away after they’ve dried, so loosen them with a salt, ice, lemon scrub. Add 3 tablespoons salt, 2 tablespoons fresh lemon juice, and 1 cup crushed ice to the carafe. Swirl vigorously for about one minute, letting the ice’s gentle abrasion break up the oily film without scratching the surface.
Pour out the mixture, then rinse with cold water until the carafe looks sparkling and free of coffee spots.
For heavier buildup, make a paste from baking soda and just enough water. Scrub stained areas for one minute with a bottle brush, reaching the bottom and corners. Rinse thoroughly to remove loosened residue and cleaner. If oils remain, soak the carafe according to its material and manufacturer’s cleaning guidance, then rinse.
Check for Cracked Glass
Before scrubbing away stubborn coffee oils, inspect the glass carafe under bright light, checking both the inside and outside for hairline cracks, rim chips, or tiny star-shaped fractures. Look closely at the bottom and around the handle, where stress points and hidden damage often appear.
Compare suspicious marks with a clear area: a crack catches light as a thin line, while stains or etching usually look uniform and filmy.
If you find any crack, chip, or starburst, stop using the carafe. Pressure can worsen the damage, causing breakage and injury. Don’t try to scrub through or scrape the damaged spot. Set the carafe aside and replace it. If the glass looks intact, proceed with stain-removal methods, such as a salt-and-crushed-ice mixture with lemon.
Prevent Thermal Shock Damage
Prevent thermal shock by letting a glass carafe reach room temperature, or rinsing it with lukewarm water, before adding any cleaning solution. Never pour boiling water into cold glass or plunge a hot carafe into cold water; sudden expansion can crack it.
Use these safer cleaning practices:
- Mix equal parts warm water and distilled white vinegar, keeping the solution warm, not hot, during an acidic soak.
- If you use salt and ice, choose crushed ice and scrub briefly, about one minute, rather than using whole cubes that create sharp temperature changes.
- After an ice step, rinse immediately with cold water, then avoid switching straight to hot water.
For hairline stress or chips, skip ice, salt, and hot soaks. Choose gentle warm-water cleaning instead, and follow manufacturer’s instructions.
Air-Dry Before Reassembly
A clean carafe should air-dry completely before you reassemble it or return it to the coffee maker. After scrubbing, rinse it thoroughly, then place it upside down in a clean, dry dish rack or on a towel. Keep the lid, filter basket, seals, and removable pieces separate so air reaches every surface.
Wait until the rim, base, and crevices show no visible droplets or cloudiness.
Air-drying matters after soaking with equal parts warm water and distilled white vinegar or with vinegar and dish soap. It helps prevent moisture, lingering odors, and residual film from affecting the next brew. Reassemble only when every part is completely dry.
After salt, ice, and lemon, rinse with cold water so loosened residue won’t redeposit while the carafe dries.
Conclusion
With the right routine, you can keep your coffee maker carafe clean, clear, and ready for every brew. Let it cool before soaking, match vinegar time to the stain, and use a bottle brush to reach stubborn residue.
If you use a French press, rinse away oils and inspect the glass carefully. Don’t risk thermal shock: avoid sudden temperature changes, then let every part air-dry before reassembly. These simple habits prevent odors, stains, and damage.