
How to Clean a Reusable Coffee Filter for a Cleaner Cup
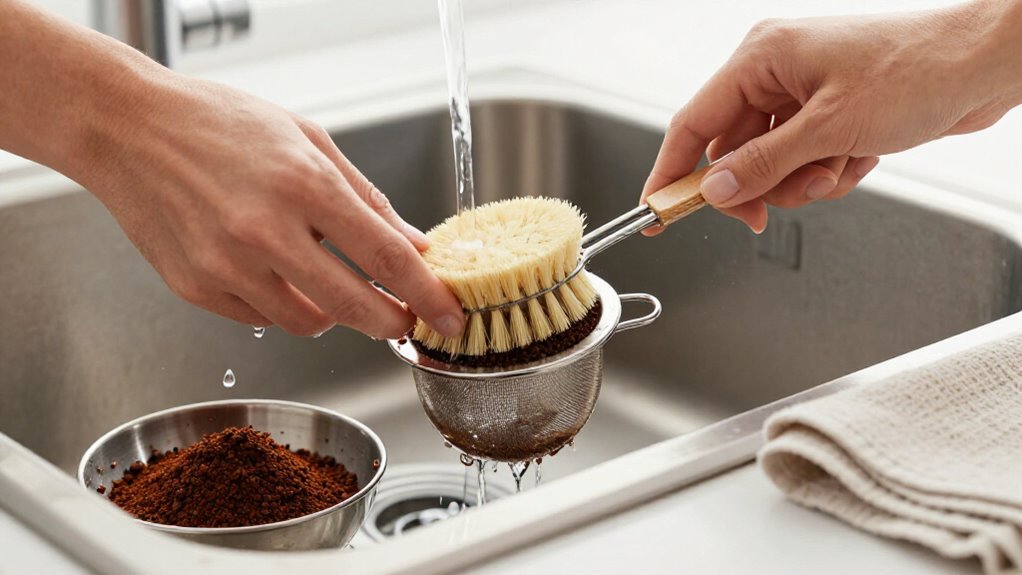
For a cleaner cup, rinse your reusable filter immediately after brewing and shake out grounds before oils dry. Turn it inside out and flush the mesh with warm water.
Scrub gently with mild dish soap and a soft-bristle brush, then rinse until no suds remain.
Air-dry it completely.
Weekly, soak it for 30 minutes in equal parts white vinegar and warm water, then rinse thoroughly.
Inspect for clogs, rust, or fraying; you’ll learn more below.
Prevent Bitter Coffee Residue
To prevent bitter coffee residue, rinse your reusable filter immediately after brewing and shake out the grounds before oils dry onto the mesh or basket. Use warm water and a small amount of mild dish soap after each use to dissolve surface oils. Rinse thoroughly; any remaining detergent can transfer off-flavors to your coffee.
For stubborn, bitter-tasting residue, soak the filter for about 30 minutes in equal parts distilled white vinegar and warm water. Rinse it well with warm water afterward to remove every trace of vinegar. Deep-clean the filter every six to eight weeks, or sooner if you brew daily, because accumulated oils can produce harsh flavors and restrict flow. After cleaning, air-dry the filter completely. Drying helps prevent mold and musty odors.
Gather a Soft-Bristle Brush
Start with a small, soft-bristled nylon or silicone brush; a toothbrush-style brush works well for reaching fine mesh, seams, and the underside of the filter rim. Choose a narrow, tapered head with bristles; it reaches edges without snagging.
- Use mild dish soap, warm water, and a bowl for scrubbing.
- Tap grounds into compost, then rinse the filter to release loose fines.
- Brush gently across the mesh plane, concentrating on the rim, underside, and seams. Avoid steel wool, metal brushes, and stiff bristles; excessive pressure can deform holes or wear plating.
- Rinse until water runs clear, inspect for trapped particles, and air-dry the brush and filter fully. Replace any brush with frayed, hardened, or sparse bristles to prevent scratching and maintain effective cleaning.
Weekly Vinegar Soak Timing
Once the filter and brush are clean, soak the reusable filter weekly for about 30 minutes in equal parts distilled white vinegar and warm water. This routine loosens coffee oils and residue before they harden in the mesh.
Don’t extend the weekly treatment overnight; longer contact can encourage lingering vinegar odor without improving routine maintenance. Keep the schedule consistent even when your coffee still tastes normal, because old oils can gradually create bitterness.
| Schedule | Practical target |
|---|---|
| Weekly | Every 7 days, regardless of taste changes. |
| Standard soak | 30 minutes, not overnight. |
| Solution | 1:1 vinegar-to-warm-water ratio. |
| Heavier buildup | Keep the same ~30-minute limit. |
Afterward, rinse with warm running water until the vinegar smell disappears, then air-dry; damp storage can promote mold or bacteria between treatments.
Remove, Rinse, Scrub, Dry
Tap out the spent grounds, then rinse the filter inside out with warm water. Scrub residue from the mesh and crevices with mild soap and a soft brush, clearing any clogged openings.
Rinse away all soap and air-dry the filter completely before storing it.
Remove Coffee Grounds
After brewing, invert the reusable filter over a compost bin or trash can and tap it firmly to release the spent grounds. Hold the filter by its rim or handle, keeping the basket positioned over the container. Tap the side and base with controlled, moderate force until no loose grounds fall out. Don’t strike the filter against a hard countertop; repeated impact can deform a metal basket, loosen its frame, or damage fine mesh.
For stubborn clumps, use a soft-bristled brush or toothbrush to lift grounds from seams and corners, directing the debris into the bin. Check the filter’s folds, joints, and mesh for trapped particles before setting it down. Removing grounds limits stale odors, prevents buildup, and keeps residue from drying in place.
Rinse With Water
With the loose grounds removed, rinse the filter under warm running water, turning it inside out to dislodge particles trapped in the mesh and seams. Continue rinsing from both sides, allowing water to pass through every opening rather than pooling on the surface. Hold the filter over a sink strainer or fine sieve so loosened grounds don’t enter the drain.
Rotate the filter slowly and check the rim, folds, and attachment points for remaining particles. Use steady water pressure, but don’t stretch fine metal, nylon, cloth, or composite mesh. If the water runs cloudy, keep rinsing until it appears clear and no loose debris remains. This rinse limits coffee oils from drying onto the filter and helps preserve consistent flow during your next brew.
Scrub Away Residue
Scrub the filter gently with a soft toothbrush or sponge and a small amount of mild dish soap, concentrating on the mesh, rim, seams, and crevices where coffee oils collect. Use light pressure to avoid damaging fine metal, nylon, or cloth filtration surfaces. Pay attention to the basket’s underside and holder joints, where residue can remain after rinsing. If you notice stubborn oily film, make several gentle passes rather than scrubbing aggressively.
Keep the filter supported in your hand so you don’t deform its shape. Rinse it under warm running water from both sides, turning it inside out when possible, until no soap film remains. Tap out lingering water, then place the filter upside down on a clean towel or in a well-ventilated area.
Clear Clogged Mesh
Begin by turning the filter upside down over a trash can or compost bin to release spent grounds. Rinse the filter under warm running water, directing the stream through the mesh to flush out trapped particles. Hold it inside out, so loosened grounds and oils exit. Use a soft-bristled brush or toothbrush to scrub both sides; don’t apply excessive pressure, which could deform metal, nylon, or composite mesh.
Continue until rinse water runs clear. If residue remains, spot-soak the mesh for 15–30 minutes in warm water, or use vinegar solution during a deeper cleaning. Scrub again, then rinse thoroughly to remove loosened oils and cleaning solution. Set the filter aside to dry fully before storage, preventing trapped moisture from causing odors or mold.
Dry Completely
Once brewing is complete, remove the filter and empty the grounds into the trash or compost. Rinse it under warm running water to flush out remaining particles. Apply a small amount of mild dish soap, then scrub the mesh or basket gently with a soft-bristle brush or toothbrush. Use light pressure to avoid deforming or damaging the mesh.
Rinse the filter thoroughly again, working water through the inside, creases, and edges until no soap or residue film remains. Shake off excess water, then place the filter on a clean, dry towel in a well-ventilated area. Let it air-dry completely before storing or using it. Don’t store a damp filter: trapped moisture encourages mold and bacterial growth, which can create off-flavors and compromise coffee’s taste.
Gold-Tone Filter Care
Rinse your gold-tone filter immediately after brewing and knock out the grounds first. Use warm water and a soft brush to remove coffee oils without abrading the finish. Don’t use abrasive pads or harsh scrubbing, which can cause surface scratches.
Daily Rinsing Routine
After each brew, you’ll protect the gold-tone filter by dumping the grounds immediately and rinsing it with warm water before coffee oils harden. Hold the filter under running water, and rinse both sides of the gold mesh. Use gentle pressure, directing water through the holes to dislodge trapped particles without deforming the mesh.
Check the seams and surface under good light. If a film remains, apply a small amount of mild dish soap and wipe gently with a soft sponge or toothbrush. Rinse thoroughly until no suds remain, so soap can’t affect your next cup.
Place the filter on a clean towel in a well-ventilated area, and let it air-dry completely. Consistent daily rinsing matters because coffee acids can affect the gold-tone finish. Don’t stack or store the filter while damp; residual moisture encourages odors and mold growth.
Removing Coffee Oil
Daily rinsing removes loose grounds, but hardened coffee oils need a deeper treatment. For a gold-tone filter, remove all grounds, then rinse promptly with warm water. This limits coffee acids and oils bonding to the fine mesh.
To dissolve an oil film, soak the filter for 30 minutes in equal parts distilled white vinegar and warm water. Rinse thoroughly until no vinegar odor remains. If residue persists, gently brush the mesh with a toothbrush during the soak. Use minimal pressure; the fine weave needs protection.
Don’t use harsh or abrasive cleaners, which can degrade the finish and leave residue that affects flavor. After cleaning, air-dry the filter completely, ensuring no moisture remains trapped. A dry filter resists buildup and helps your cup taste clean.
Preventing Surface Scratches
Protect a gold-tone filter’s delicate coating by cleaning it with a soft-bristle brush or toothbrush rather than an abrasive scrubber.
Avoid harsh cleaners and strong abrasives, which can scratch the surface and accelerate wear. For mineral or oil buildup, soak the filter only as needed in equal parts warm water and white vinegar. After soaking, rinse it thoroughly with warm water to remove acid and cleaner residue.
If you use a dishwasher, confirm the manufacturer’s instructions first and place the filter on the top rack. Inspect the mesh regularly for nicks, scratches, or tears. Replace the filter if damage compromises filtration or could release fine particles into your coffee. Handle it gently during removal and storage to preserve its coating and consistent brewing performance.
No Lingering Coffee Oils
Rinse your reusable filter immediately after brewing with warm running water, turning it inside out to flush coffee oils from the mesh before they set.
For daily cleaning, remove loose grounds, then wash with mild soap and a soft brush. Avoid harsh detergents; they can leave film or clog tiny pores. Rinse until no suds remain, and air-dry the filter fully in a well-ventilated area.
Damp residue can trap odors and promote buildup.
Every six to eight weeks, soak the filter for 30 minutes in equal-parts distilled white vinegar and water. Rinse thoroughly with warm water to remove vinegar residue. If coffee odor or flavor persists, make a paste with two parts baking soda and one part water, gently scrub the mesh, and rinse completely.
Watch for Rust or Fraying
After each wash, inspect the filter for rust, fraying, or structural damage. Check stainless steel mesh around joints and any area that stayed wet; trapped moisture can trigger oxidation quickly. If you find a rust spot, gently scrub it, rinse it, and dry the filter before storage. Persistent rust signals that you should replace the filter.
For cloth filters and gold-tone mesh, look for fraying, thinning, or tears. Damaged sections can shed fibers or allow grounds through, producing a gritty cup. Examine the rim and seams for separation, cracks, or loosening edges, which can worsen over time.
Replace the filter when you see repeated tears or structural damage. Even defects can change filtration consistency from one brew to the next, so don’t postpone replacement.
Check Mesh for Clogs
Once the filter passes its rust and damage check, inspect the mesh under bright light for dark spots where fine grounds have collected. After brewing, remove grounds and check packed pores.
Dark patches, slower dripping, or harsher flavorercan indicate trapped fines. Clear the mesh as follows:
- Rinse the filter under warm running water from the inside out, then upside down, so water pushes particles through the openings.
- Brush the mesh gently with a soft-bristled brush or toothbrush. Use circular motions and light pressure; don’t bend or deform the screen.
- Inspect sides, focusing on seams and areas where residue may remain.
- For clogs, soak your filter 30 minutes in equal parts white vinegar and warm water, then rinse and air-dry fully.
Test Filter Flow Monthly
Monthly, you’ll run plain water through the reusable filter to verify that it drains evenly without clogging or stalling. Compare its flow with a clean filter; a slowdown indicates residue buildup. Turn the filter over and inspect the mesh or basket for dark film and grounds lodged in pores.
If flow has slowed, soak the filter for 30 minutes in equal parts warm water and distilled white vinegar. Rinse it with warm water, then air-dry it. For blockage, apply a paste of two parts baking soda and one part water.
Gently scrub the mesh, rinse away every trace, and test flow again. If water still won’t pass cleanly, deep-clean the filter or replace it; damaged mesh or tears can restrict flow and affect extraction.
Conclusion
Clean your reusable coffee filter after every brew to remove grounds and oils before they harden. Rinse both surfaces, brush the mesh gently, and let it dry completely.
Once a week, soak it in diluted white vinegar, then rinse thoroughly. Check flow and inspect for clogs, rust, or fraying each month. Replace damaged filters promptly.
With consistent care, you’ll prevent bitter residue, protect the mesh, and produce a cleaner, more balanced cup every single time.