Pour Over Coffee Ratio
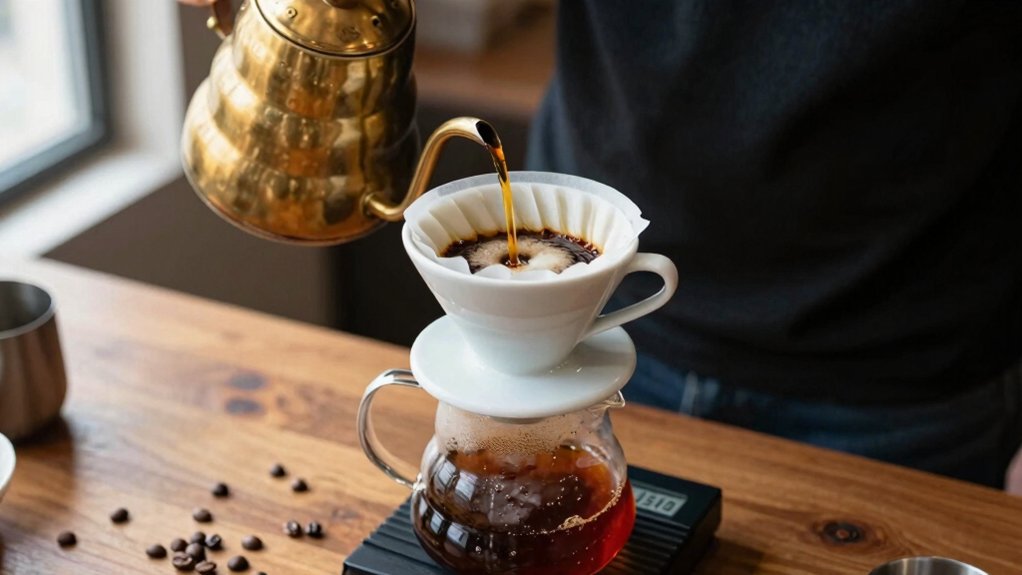
Use a scale and aim for a 1:15–1:17 coffee-to-water ratio as your default. Push to 1:14–1:15 for a robust cup or 1:18–1:20 for something milder. Bloom with 2–3× the dose for 30–45 seconds. Then pour in controlled concentric spirals with a gooseneck to avoid channeling.
Grind medium-fine for V60/Kalita and slightly coarser for Chemex. Keep water 195–205°F and note times so you can refine technique and results further.
Quick Overview
- Use a weight-based brew ratio: 1:14–1:15 for robust, 1:16–1:17 for balanced, and 1:18–1:20 for mild.
- Measure bloom water at 2–3× the coffee dose and bloom for 30–45 seconds to stabilize extraction.
- Start a pour-over session at a 1:15 ratio and adjust ±1 in response to roast or grind changes.
- Use medium-fine grind for V60/Kalita; medium for Chemex, and coarsen or fine-tune grind to control flow time.
- Pour with a gooseneck in slow concentric spirals. Pause in pulses every 20–30 seconds for reproducible results.
Brew Ratio Reference Chart
Wondering which brew ratio will match your taste and brewer? You’ll use the reference chart to pick 1:14–1:20 targets: 1:14–1:15 for robust cups, 1:16–1:17 for balanced, and 1:18–1:20 for milder profiles. Measure by weight, scale bloom water at 2–3× the dose, and time bloom 30–45s to maximize bloom stability.
Maintain steady pour symmetry to avoid channeling and uneven extraction. Adjust within the golden range (1:15–1:17) when roast or grind changes. Use the table below to guide quick decisions; it shows common strength targets, a sample coffee:water, and a practical note for adjustment.
| Strength | Example | Note |
|---|---|---|
| Robust | 20g:300g | Start 1:15 |
| Balanced | 20g:320g | Adjust ±1 ratio |
| Mild | 20g:360g | Avoid over-extracting |
Grind Size Quick Reference
How fine should you grind for your pour over? You’ll aim for a medium-fine grind that balances extraction and flow. Grind size controls contact area, affecting texture and extraction consistency. Match grind to your dripper and pour rate; then tweak in small steps. Watch brew time and cup clarity rather than guessing.
- V60 / Kalita: medium-fine, fast, even flow; promotes balanced extraction and clean texture.
- Chemex: medium, slightly coarser to slow flow and reduce sediment.
- Aeropress short: fine to medium-fine, increases extraction in short contact.
- Coarser for slower pours; increases total brew time when you need more body without over-extracting.
Adjust grind to maintain ideal brew time and consistent bloom time for repeatable results.
Bloom Time and Technique
Start your bloom with a measured 2–3× bloom ratio (by weight) and a grind just slightly finer than your brew grind to speed CO2 release without over-extraction.
Let the bloom sit 30–45 seconds while gently agitating once or twice to break surface bubbles. Then continue your controlled pour pattern to promote even saturation and prevent channeling. These small adjustments to duration, pour sequence, and light agitation will sharpen clarity and stabilize extraction across different roast levels.
Ideal Bloom Duration
Why does bloom time matter so much for pour over coffee? You control bloom timing to release CO2 quickly and predictably; that release prevents channeling and uneven extraction.
Aim for 30–45 seconds in most cases: shorter for very fresh, degassing beans and longer for darker roasts or coarser grinds. Use 2–3× the coffee dose in bloom water to saturate grounds uniformly. Then wait while gases escape and bed settles.
During this interval, you’ll notice aroma development; it signals proper degassing and readiness for the main pour. Don’t rush: too brief a bloom yields underdeveloped, sour notes; too long wastes heat and can under-extract.
Measure time with a timer and adjust in small increments to match roast, grind, and your flavor goals.
Water Pouring Pattern
Having let the bloom settle and watched the grounds release CO2, you’ll move into the pouring pattern that governs extraction consistency and flavor clarity. Start with a controlled concentric pour to saturate the bed, using 2–3 times the dose for bloom water. Then pause.
Resume with steady, slow spirals from center outward; avoid direct stream on the filter walls to prevent channeling. Maintain water flow rate to keep the slurry level rising gradually. Fluctuations shift extraction nuance toward over- or under-extraction.
Time segments (e.g., 30–45s bloom, then pulses every 20–30s) help you reproduce results. Use a gooseneck kettle for predictable flow and weigh each addition. Precise pour pattern and timing yield cleaner, balanced cups.
Bloom Grind Size
How finely you grind for the bloom directly shapes degassing speed and initial extraction. So, aim for a grind that lets CO2 escape without creating an impenetrable crust or overly rapid drainage. You’ll use a slightly finer-than-brew grind size than full extraction calls for when you want controlled swelling and visible bubbling during the 30–45 second bloom.
Adjust the bloom grind in small increments: too coarse and CO2 carries solubles away, producing weak early flavor; too fine and gases trap, causing channeling later. Measure changes against consistent bloom water (2–3× dose) and time. Then, revert or refine. Train your palate and scale-based notes so grind size choices reliably predict downstream extraction and cup balance.
Bloom Coffee Ratio
Blooming uses a concentrated water-to-coffee ratio and a timed technique to release CO2 and kick-start even extraction: typically pour 2–3× the coffee dose (so for 20 g coffee use 40–60 g water) over 30–45 seconds. Let the grounds swell and bubble without agitation. You’ll measure precisely, start your timer immediately, and watch surface activity to confirm an effective bloom. Aim for bloom timing of 30–45 seconds; shorter bloomed roasts may retain CO2. Longer bloomed beds cool and under-extract.
Use water temperature between 195–205°F to balance gas release and soluble extraction during the bloom phase. You won’t need agitation here. Maintain consistency in dose, pour volume, and temperature so subsequent pours yield predictable extraction and clarity.
Agitation And Release
After the bloom, controlled agitation and timely release help equalize extraction by breaking surface tension and redistributing channels without overworking the bed. You perform a focused agitation strategy: use a gentle swirl or a short, centered stir 10–15 seconds into the bloom drain to collapse large bubbles and expose fresh grounds.
Time the release so water level drops just below the crown before continuing concentric pours; that prevents channeling while preserving bed integrity. Monitor aroma release during agitation. A prompt, clean scent indicates effective CO2 evacuation and ready extraction.
Avoid aggressive stirring or prolonged agitation, which extracts fines and increases bitterness. Calibrate agitation intensity to grind size and dose, and document adjustments for repeatable results.
Frequently Asked Questions
How Does Water Mineral Content Affect Pour Over Extraction?
Water mineral content alters extraction by changing water hardness and mineral balance. You’ll notice this in flavor clarity and extraction efficiency. Hard water with high calcium/magnesium boosts solubility of acids and aromatics, increasing extraction. You might dial coarser grind size or shorter brew time.
Soft water extracts less, producing weaker, flat cups unless you adjust grind size finer or extend contact time to regain balance.
Can I Use Teaspoons Instead of a Scale for Ratios?
You can, but you shouldn’t if you want consistency. Teaspoon equivalents offer rough dosing (about 2 teaspoons ≈ 10 grams); however, measurement accuracy is poor due to grind, tamping, and bean density.
Using teaspoons gives variable strength and extraction. A scale ensures repeatable ratios and predictable results. If you must use teaspoons, weigh a few doses to establish your personal teaspoon equivalent and note it for more consistent brewing.
How Does Roast Date Change Ideal Ratio and Grind?
You’ll increase dose or use a finer grind for very fresh beans, as they’re degassing and extract less predictably. Aim slightly stronger, toward 1:14–1:15, and a bit finer.
Older beans need a coarser grind and milder dose or higher ratio, between 1:16 and 1:18, to compensate for oxidation and flattened flavors. Adjust brew time and grind size incrementally while tasting to dial in balance.
Does Cup Size Alter Recommended Brewing Temperature?
No, cup size doesn’t require a different brewing temperature. You should stay within 195–205°F for optimal extraction.
You will, however, need better temperature stability for larger brews because greater water volume cools more and can lengthen extraction. Maintain grinder consistency so particle distribution stays uniform across doses; inconsistent grind forces you to tweak temperature or time to compensate.
Adjust pouring speed and preheat vessels rather than changing target temperature.
How to Adjust Ratio for Milk-Based Drinks (Latte/Cappuccino)?
Use a slightly stronger brew: push toward 1:14–1:15 so the espresso-strength-equivalent holds up to milk.
For lattes, aim for a latte milk ratio that lets milk dominate gently. More milk results in milder coffee; use 1:15 if you want more coffee presence.
For cappuccinos, prioritize cappuccino foam balance with equal parts espresso, steamed milk, and foam. Keep brew around 1:14–1:15 and adjust milk volume and foam density to taste.
Conclusion
You’ve now got the essentials to dial in your pour-over: use the reference chart for ratios, match grind size to brew time, and give a short, vigorous bloom with the correct bloom ratio.
Pour in controlled concentric circles, agitate gently to ensure even extraction, and stop once the target brew time’s reached. Keep notes and adjust grind, water, or pour pattern for balance.
With precise tweaks, you’ll consistently get clean, nuanced cups.